Login or create new account.
By registering on joomprod.com, you will have immediate access to all our free products and to the public side of our support forum.
Enjoy our subscriptions.
Each of our subscriptions allow you to enjoy the private side of the support forum and all the update of our products for a period ranging from 3 months to 1 year.
Payment And immediate download.
After subscribing to one of our subscription, the products are immediately downloadable.
Login
Customization Help Center
Before code modification in AdsManager or other products, check how you can customize without hack !
AdsManager - End of life
It is with great regrets that we have chosen to end the developpement of Adsmanager and its other associated components.
AdsManager is born 10 years ago and, as of today, the number of new subscriptions and downloads have fallen and we cannot maintain the component anymore.
All active subscribers will be able to continue enjoying support until the end of their subscription.
The components will be free and no support will be provided anymore for the other users.
![]()
Ad Durations
This option allows the user to select the duration of their ad.
It will add a drop-down list in the add form including each options enabled in the administration.

To add, edit or delete durations in this list, go to the administration of your website and click on the 'Durations' link of the PaidSystem dashboard.
The table lists the various options already present and whether they are enabled.

Tips are displayed above the table to explain the AdsManager behavior for each option.
To change or delete durations, select the option in question and click the corresponding button on the top of the window.
To add a new option, click the 'New' button.

Name: Option name as it will be displayed in the list.
Duration type: The option will appear for the selected ad's type. 'New' means new ad, 'Renew' means renewal ad.
Ad Duration: Duration of the ad in days, or unlimited.
Credits: Option price in credits, free if left blank
Published: Allows you to enable or disable the option.
Category: Categories in which the option will be available.
Once the form is validated, the newly created option will be displayed with others.
![]()
Image Pricing
With PaidSystem, you can specify a price for additional images the users add to their ads.
1. Set a price for all the additional images
You can set a general price for all the additional images in the configuration page of PaidSystem.

One important thing to understand is that the base number of free images is set in the AdsManager componant configuration.
When you fill the 'Num Images' field, you specify the number of additional images that the users can upload per ad.
The price of these images is set in the 'Image Price' field.
2. Set a price for all the additional images in a specific category
Click on the 'Categories' link of the PaidSystem submenu.
This page displays a table listing all the categories configured in the AdsManager component.
by clicking the 'Specific' check box of one category, several fields will appear on the page.

All you need to do at this point is to fill the images fields with the values you want, exactly like the first point.

Field Pricing
Click on the 'Fields' link of the PaidSystem dashboard.
This page displays a table listing all fields configured in the AdsManager component. But unlike AdsManager, you can assign a specific price to the desired fields.

Simply enter the price in front of the corresponding fields and submit the form.
Note: If the field is not required and the user leaves it empty, the user will not have to pay for it.
Ad Options
Three types of options are available for your ads, configurable to be either free or paid.
To access, click the link for the item you want in the PaidSystem dashboard.
Sticky Ad Options
This option will make ads stick to the top of searches for a given period, based on the PaidSystem configuration.
It will add a drop-down list in the ad form corresponding to the options enabled in the administration.
To add, edit or delete a Sticky Ad Option in this list, go to the administration of your website and click on the 'Sticky Ad Options' link of the PaidSystem dashboard.
The table lists the various options already present and whether they are enabled.

If you want to change or delete a sticky ad option, select the option in question and click the corresponding button on the top of the window.
To add a new option, click the 'New' button.

Name: Option name displayed in the list.
Sticky Duration: Length of time in days the ad will be sticky.
Credits: Option price, free if left blank
Published: Allows you to enable or disable the option.
Category: Categories in which the option will be available.
Once the form is validated, the newly created option will be displayed with others.
Highlighted Ad Options
This option will highlight the ad during for a given time period, rendering it more visible in ad listings.
It will add a drop-down list in the add form including each enabled options in the administration.
To add, edit or delete a highlight option in this list, go to the administration of your website and click on the 'Highlight options' link of the PaidSystem dashboard.
The table lists the various options already present, enabled or not.

If you want to change or delete a highlight option, select the option in question and click the corresponding button on the top of the window.
To add a new option, click the 'New' button.

Name: Option name displayed in the list.
Highlight Duration: Length of time in days the ad will remain highlighted.
Credits: Option's price, free if left blank
Published: Allows you to enable or disable the option.
Category: Categories in which the option will be available.
Once the form is validated, the newly created option will be displayed with others.
Featured Ad Options
This option will display the ad in a special featured ads section for a given duration.
It will add a drop-down list in the add form including each enabled options in the administration.
To add, edit or delete a featured option in this list, go to the administration of your website and click on the 'Featured Ad Options' link of the PaidSystem dashboard.
The table lists the various options already present and whether they are enabled.

If you want to change or delete a featured option, select the option in question and click the corresponding button on the top of the window.
To add a new option, click the 'New' button.

Name: Option name displayed in the list.
Featured Ad Duration: Length of time in days the ad will be featured.
Credits: Option price, free if left blank
Published: Allows you to enable or disable the option.
Category: Categories in which the option will be available.
Once the form is validated, the newly created option will be displayed with others.
Category Pricing
There are three possible configurations for the categories.
1. Set a price for all the categories
You can set a general price for all your categories in the configuration page of PaidSystem.

You just have to fill the 'Category Price' field with the price you want.
2. Set different prices for the categories
Click on the 'Categories' link of the PaidSystem submenu.
This page displays a table listing all the categories configured in the AdsManager component. But unlike AdsManager, you can assign a specific price to the desired category.
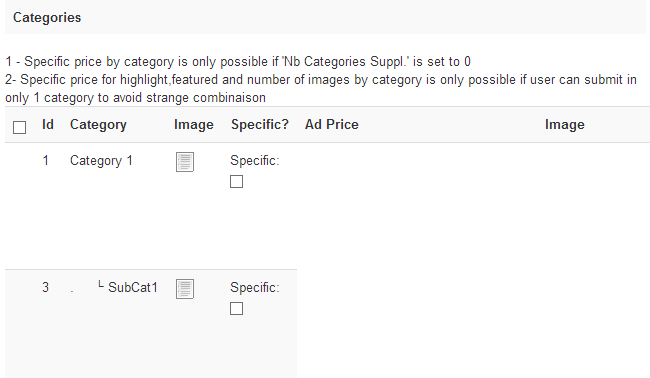
Note: Before adding a price to a category, you must first take a look to two restrictions noted in the top.
1. You can assign a price to a category only if you set the 'Extra Categories' parameter to 0 in the PaidSystem configuration.
2. You can assign a price to a category only if you forbid the ability to post an ad in multiple categories.
These restrictions are present to prevent users from paying for the same category more than once.
To add a price, check the 'Specific' check box for the field corresponding to your category.

Once checked, a new text field appears, you only have to fill this field and submit the form.
Tips : in this page, you can also define a price for all the supplemental images the user might want add to its ads.
3. Set a specific price for all the additionnal categories
This solution work only in multiple categories mode.
You can set the maximum number of categories that can be selected by filling the field 'Nb. Categories Suppl.'.
The price of the first selected category will be the one set to the 'Category Price' field.
All the others categories selected after the first will cost the amount specified in the 'Additionnal Category Price'.